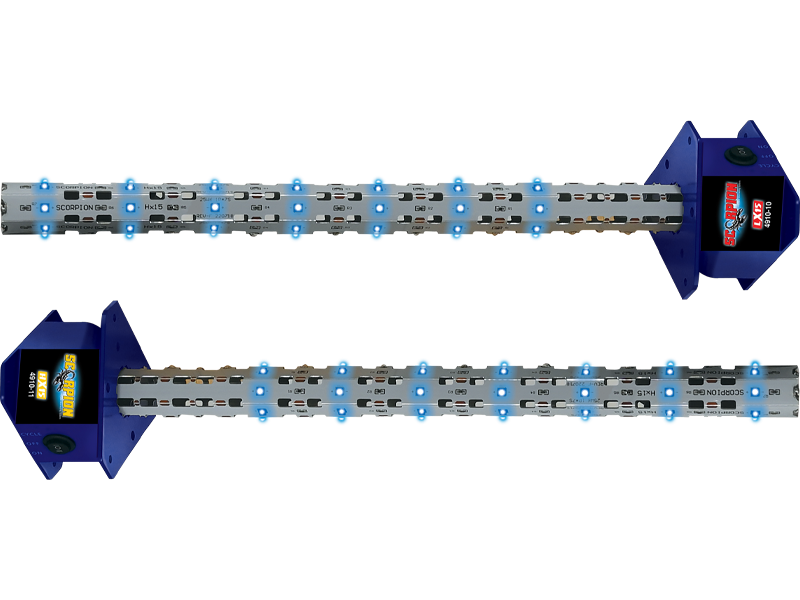
Scorpion UVC-LED System
• 15˝ UVC-LED Disinfection System
• Up to 5X the life compared to standard bulbs
• Rugged design with shatterproof LED
• Kills mold, mildew, viruses, and bacteria on and around your HVAC coil
• Stops foul odors like dirty sock smell
• Integrated toggle switch for dual run mode options
• 360 degree design for complete treatment
• Air flow sensor to power only when fan is running
• Easy install with integrated magnet or supplied hardware
• LX15 - Easy 24VAC input voltage on installation / HX15 - Easy 110-277VAC Input voltage on installation
• Optimum 265nm wavelength
Meet’s UL 2998 zero ozone emission certification
Description:
The Scorpion is a UVC-LED disinfection unique system designed for use in residential and light commercial HVAC systems. The LED light has 30,000 hours of run time and with an integrated air flow sensor the Scorpion UVC-LED can last up to 5 times longer than traditional UV bulbs. The Scorpion UVC-LED is designed to kill mold, mildew, bacteria, viruses, and other harmful biological growth in the HVAC system and on the evaporator coil. The system will also help reduce foul and musty odors like dirty sock smell and will even help keep the drain line from clogging due to buildup in the condensate line.
The Scorpion is designed to treat any residential ducted HVAC system with no maintenance for up to 30,000 hours of treatment life. The system can easily be installed using the integrated magnet inside, above, or below the evaporator coil. If the Scorpion is being installed in a system where the magnet cannot be used than use the supplied hardware to mount the Scorpion to your system. The powerful LED light should be installed in a location where it is fully shining on the evaporator coil to provide complete treatment.
| Packaging Size | Part Number | Additional Info |
|---|---|---|
| LX15 | 4910-10 | 24 VAC |
| HX15 | 4910-11 | 110-277 VAC |
Directions:
WARNING: MAKE SURE POWER IS DISCONNECTED TO THE HVAC EQUIPMENT BEFORE INSTALLATION IMPORTANT!
• Only qualified technicians should install this product
• Install in accordance with relevant building codes
• Read instructions carefully including safety warnings
WARNING: PROTECT EYES FROM UV LIGHT. TURN OFF UNIT OR DISCONNECT ALL POWER BEFORE SERVICING.
Before installing the Scorpion it is necessary to determine the optimal mounting location inside the air system. Consider an installation location that will allow the Scorpion UVC LED light to shine on the greatest surface area of the coil. For enhanced anti-microbial effect, multiple Scorpion UVC LED lights can be installed in the system. Review the full Instruction Bulletin for installation graphics and full wiring diagrams.
MOUNTING DIRECTIONS
OPTION 1: Scorpion installed inside the coil using the integrated magnet
STEP 1: Confirm power is off to the system. Remove the access panel to the air handler.
STEP 2: Remove the “A” panel on the evaporator coil to gain access to the center of the coil.
STEP 3: Using the Scorpion’s integrated magnet, attach the Scorpion to the metal “A” panel on the far side of the evaporator coil.
For a “W” or “N” shaped coil, install a second Scorpion inside the second section of coil. See example image in Figure 1.4 on the full instruction bulletin.
STEP 4: Run the wires down the cabinet, cut a small access hole for the wires if one does not exist.
STEP 5: Replace the “A” panel on the evaporator coil that was previously removed.
OPTION 2: Scorpion installed inside the coil using the provided hardware
STEP 1: Confirm power is off to the system. Remove the access panel to the air handler.
STEP 2: Drill a 1 ¼” hole in the “A” plate of the evaporator.
STEP 3: Insert the supplied grommet into the hole drilled into the “A” plate.
STEP 3: Insert the LED bulb in the grommet which is placed inside of the drilled 1 ¼” opening.
STEP 4: Secure the Scorpion to the “A” plate using the provided hardware.
For a “W” or “N” shaped coil, install a second Scorpion inside the second section of coil after drilling the 1 ¼” hole in the second panel, inserting the grommet, and securing the Scorpion. See example image in Figure 1.4 on the full instruction bulletin.
OPTION 3: Scorpion installed above the coil
STEP 1: Confirm power is off to the system. Remove the access panel to the air handler.
STEP 2: Using either the integrated magnet or supplied hardware, secure the Scorpion to the side wall of the unit above the coil.
See figure 1.2 for example on the full instruction bulletin.
WIRING DIRECTIONS
FOR THE SCORPION LX15 4910-10:
STEP 1: Connect the Scorpion to 24VAC power using the white (neutral) and black (hot) wires. The Scorpion can be wired directly to the HVAC
systems 24VAC transformer, or add a 24VAC transformer as needed. The Scorpion LX15 can be wired to 18-32VAC input and connected to the
door interlock switch so the Scorpion powers down if the door/access panel is open. See figure 1.5 on the full instruction bulletin for wiring diagram. Wire the Scorpion to
continuous power, do not connect to the blower relay. See Step 2 for option modes to cycle the Scorpion with the fan.
STEP 2: Set the Scorpion power switch to “ON” for constant run mode. Set the power switch to “CYCLE” to run only when the fan is running and The integrated air flow sensor activates the Scorpion to power on. (The cycle mode is recommended for longer service life for most applications.) When first turning on the Scorpion in CYCLE model (air flow sensor mode) the LEDs will stay illuminated up to 120 seconds for an initial calibration. After the calibration period, the Scorpion LEDs will turn off and will then only turn back on when the fan is running and there is continuous airflow.
STEP 3: Replace the access panel to the unit.
STEP 4: Place the provided WARNING/INSTALL DATE sticker on the exterior of the unit.
STEP 5: Add the date of installation using permanent marker on the sticker.
STEP 6: Restore power to the unit.
STEP 7: Register the Scorpion’s warranty at nucalgon.com/scorpion-registration
IMPORTANT!
Systems with high 24 VAC loads may require the installation
of a separate 24 VAC transformer to power the UV light.
Always use a separate 24 VAC transformer with
“communicating” air systems.
Some materials inside the air system (including filter media,
flex duct, wiring etc.) may not be UV light resistant.
Use reflective tape to cover these components.
FOR THE SCORPION HX15 4910-11:
STEP 1: Connect the Scorpion to 110-277VAC power using the white (neutral) and black (hot) wires. The Scorpion HX15 can be wired to 110-277VAC input and connected to the door
interlock switch so the Scorpion powers down if the door/access panel is open. See figure 1.5 on the full instruction bulletin for wiring diagram. Wire the Scorpion to continuous power, do not connect to
the blower relay. See Step 2 for option modes to cycle the Scorpion with the fan.
STEP 2: Set the Scorpion power switch to “ON” for constant run mode. Set the power switch to “CYCLE” to run only when the fan is running and The integrated air flow sensor activates the Scorpion to power on. (The cycle mode is recommended for longer service life for most applications.) When first turning on the Scorpion in CYCLE model (air flow sensor mode) the LEDs will stay illuminated up to 120 seconds for an initial calibration. After the calibration period the Scorpion LEDs will turn off and will then they will only turn back on when the fan is running and there is continuous airflow.
STEP 3: Replace the access panel to the unit.
STEP 4: Place the provided WARNING/INSTALL DATE sticker on the exterior of the unit.
STEP 5: Add the date of installation using permanent marker on the sticker.
STEP 6: Restore power to the unit.
STEP 7: Register the Scorpion’s warranty at www.nucalgon.com.scorpionregistration
IMPORTANT!
Some materials inside the air system (including filter media,
flex duct, wiring etc.) may not be UV light resistant.
Use reflective tape to cover these components.


